

 Image 1 of 1
Cooling System Pressure Test
Cooling System Pressure Test
Purpose
Verify the integrity of the cooling system (radiator, hoses, clamps, water pump, heater core, thermostat, caps) and locate leaks or pressure loss.
Confirm system holds proper pressure for safe, reliable engine cooling and to help diagnose overheating, coolant loss, or contamination.
When to perform
Persistent or intermittent coolant loss
Engine overheating
Visible coolant residue or stains
Low coolant level with no obvious external leak
After radiator, hose, water pump, or thermostat replacement
Before vehicle submission for warranty work or safety inspection
Tools required
Cooling system pressure tester with appropriate adapter and hand pump
Pressure gauge (built into tester)
Replacement radiator cap(s) or expansion tank cap (for verification)
Clean rags and catch pan
Flashlight
Basic hand tools to access pressure port or remove cap
Preparation
Allow engine to cool completely. Never open a hot radiator or expansion tank cap.
Clean area around radiator or reservoir cap to prevent contamination.
Remove radiator cap or reservoir cap following manufacturer instructions.
Install the correct adapter from the pressure test kit to the radiator filler neck or expansion tank.
Procedure
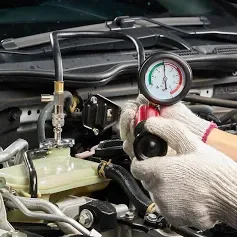
Attach the pressure tester securely to the filler neck or reservoir adapter.
Pump the tester slowly to the vehicle manufacturer’s specified test pressure. If specification is unknown, use 15–18 psi for most passenger vehicles; heavy-duty or high-pressure systems may require higher pressure—refer to service manual.
Observe the gauge for at least 5–10 minutes:
Stable pressure: system holds pressure; likely no major external leaks.
Gradual pressure drop: indicates a leak in the system (hoses, radiator, heater core, water pump, fittings).
Rapid pressure loss: substantial external leak or catastrophic component failure.
Inspect visually while pressure is applied:
Look for coolant escaping at hose connections, clamps, radiator seams, heater core lines, water pump weep hole, freeze plugs, and around the thermostat housing.
Check under the vehicle and inside the cabin (heater core) for drips or damp spots.
Use a flashlight to inspect hard-to-see areas and the area around the engine block and head gasket line for seepage.
Perform a block/head gasket check if no external leaks are found but pressure drops:
Monitor for pressure equalization between cooling system and crankcase (may require combustion leak tester / chemical test) or follow compression/leak-down tests per repair manual.
After test
Release pressure from the tester following safe procedures.
Remove tester and reinstall a serviceable radiator or reservoir cap.
Repair identified leaks (replace hoses, clamps, radiator, water pump, seals, or gaskets) or evaluate for internal leaks and head gasket failure as needed.
Refill system with the correct coolant mixture and properly bleed air from the system.
Recheck system after repair: perform a repeat pressure test and road test to verify repair and check for overheating.
Notes and cautions
Never perform this test on a hot engine. Pressurized hot coolant can cause severe burns.
Always use the correct adapter and genuine or equivalent replacement caps; an incorrect cap can give false results.
A small slow pressure loss can be due to temperature changes or minor seepage; verify with re-inspection and repeated tests.
If the water pump weep hole leaks under pressure, replacement is required.
A failed radiator cap (pressure relief valve) can cause loss of system pressure; test with known-good cap as part of diagnosis.
Typical test pressures
Most passenger cars: 15–18 psi
Some late-model/European/high-performance systems: 18–24 psi
Light trucks/heavy-duty: consult service specifications
Reporting (recommended for service shops)
Record test pressure, hold time, observed pressure loss (psi/min), and location of any visible leaks.
Note repairs performed, parts replaced, coolant type and concentration, and any follow-up recommendations.
HARRISON MVAC SERVICE AND REPAIRS LLC provides professional cooling system pressure testing and diagnostics
Cooling System Pressure Test
Purpose
Verify the integrity of the cooling system (radiator, hoses, clamps, water pump, heater core, thermostat, caps) and locate leaks or pressure loss.
Confirm system holds proper pressure for safe, reliable engine cooling and to help diagnose overheating, coolant loss, or contamination.
When to perform
Persistent or intermittent coolant loss
Engine overheating
Visible coolant residue or stains
Low coolant level with no obvious external leak
After radiator, hose, water pump, or thermostat replacement
Before vehicle submission for warranty work or safety inspection
Tools required
Cooling system pressure tester with appropriate adapter and hand pump
Pressure gauge (built into tester)
Replacement radiator cap(s) or expansion tank cap (for verification)
Clean rags and catch pan
Flashlight
Basic hand tools to access pressure port or remove cap
Preparation
Allow engine to cool completely. Never open a hot radiator or expansion tank cap.
Clean area around radiator or reservoir cap to prevent contamination.
Remove radiator cap or reservoir cap following manufacturer instructions.
Install the correct adapter from the pressure test kit to the radiator filler neck or expansion tank.
Procedure
Attach the pressure tester securely to the filler neck or reservoir adapter.
Pump the tester slowly to the vehicle manufacturer’s specified test pressure. If specification is unknown, use 15–18 psi for most passenger vehicles; heavy-duty or high-pressure systems may require higher pressure—refer to service manual.
Observe the gauge for at least 5–10 minutes:
Stable pressure: system holds pressure; likely no major external leaks.
Gradual pressure drop: indicates a leak in the system (hoses, radiator, heater core, water pump, fittings).
Rapid pressure loss: substantial external leak or catastrophic component failure.
Inspect visually while pressure is applied:
Look for coolant escaping at hose connections, clamps, radiator seams, heater core lines, water pump weep hole, freeze plugs, and around the thermostat housing.
Check under the vehicle and inside the cabin (heater core) for drips or damp spots.
Use a flashlight to inspect hard-to-see areas and the area around the engine block and head gasket line for seepage.
Perform a block/head gasket check if no external leaks are found but pressure drops:
Monitor for pressure equalization between cooling system and crankcase (may require combustion leak tester / chemical test) or follow compression/leak-down tests per repair manual.
After test
Release pressure from the tester following safe procedures.
Remove tester and reinstall a serviceable radiator or reservoir cap.
Repair identified leaks (replace hoses, clamps, radiator, water pump, seals, or gaskets) or evaluate for internal leaks and head gasket failure as needed.
Refill system with the correct coolant mixture and properly bleed air from the system.
Recheck system after repair: perform a repeat pressure test and road test to verify repair and check for overheating.
Notes and cautions
Never perform this test on a hot engine. Pressurized hot coolant can cause severe burns.
Always use the correct adapter and genuine or equivalent replacement caps; an incorrect cap can give false results.
A small slow pressure loss can be due to temperature changes or minor seepage; verify with re-inspection and repeated tests.
If the water pump weep hole leaks under pressure, replacement is required.
A failed radiator cap (pressure relief valve) can cause loss of system pressure; test with known-good cap as part of diagnosis.
Typical test pressures
Most passenger cars: 15–18 psi
Some late-model/European/high-performance systems: 18–24 psi
Light trucks/heavy-duty: consult service specifications
Reporting (recommended for service shops)
Record test pressure, hold time, observed pressure loss (psi/min), and location of any visible leaks.
Note repairs performed, parts replaced, coolant type and concentration, and any follow-up recommendations.
HARRISON MVAC SERVICE AND REPAIRS LLC provides professional cooling system pressure testing and diagnostics. If you need a certified inspection, leak location, or repair estimate, contact our service department.
Cooling System Pressure Test
Purpose
Verify the integrity of the cooling system (radiator, hoses, clamps, water pump, heater core, thermostat, caps) and locate leaks or pressure loss.
Confirm system holds proper pressure for safe, reliable engine cooling and to help diagnose overheating, coolant loss, or contamination.
When to perform
Persistent or intermittent coolant loss
Engine overheating
Visible coolant residue or stains
Low coolant level with no obvious external leak
After radiator, hose, water pump, or thermostat replacement
Before vehicle submission for warranty work or safety inspection
Tools required
Cooling system pressure tester with appropriate adapter and hand pump
Pressure gauge (built into tester)
Replacement radiator cap(s) or expansion tank cap (for verification)
Clean rags and catch pan
Flashlight
Basic hand tools to access pressure port or remove cap
Preparation
Allow engine to cool completely. Never open a hot radiator or expansion tank cap.
Clean area around radiator or reservoir cap to prevent contamination.
Remove radiator cap or reservoir cap following manufacturer instructions.
Install the correct adapter from the pressure test kit to the radiator filler neck or expansion tank.
Procedure
Attach the pressure tester securely to the filler neck or reservoir adapter.
Pump the tester slowly to the vehicle manufacturer’s specified test pressure. If specification is unknown, use 15–18 psi for most passenger vehicles; heavy-duty or high-pressure systems may require higher pressure—refer to service manual.
Observe the gauge for at least 5–10 minutes:
Stable pressure: system holds pressure; likely no major external leaks.
Gradual pressure drop: indicates a leak in the system (hoses, radiator, heater core, water pump, fittings).
Rapid pressure loss: substantial external leak or catastrophic component failure.
Inspect visually while pressure is applied:
Look for coolant escaping at hose connections, clamps, radiator seams, heater core lines, water pump weep hole, freeze plugs, and around the thermostat housing.
Check under the vehicle and inside the cabin (heater core) for drips or damp spots.
Use a flashlight to inspect hard-to-see areas and the area around the engine block and head gasket line for seepage.
Perform a block/head gasket check if no external leaks are found but pressure drops:
Monitor for pressure equalization between cooling system and crankcase (may require combustion leak tester / chemical test) or follow compression/leak-down tests per repair manual.
After test
Release pressure from the tester following safe procedures.
Remove tester and reinstall a serviceable radiator or reservoir cap.
Repair identified leaks (replace hoses, clamps, radiator, water pump, seals, or gaskets) or evaluate for internal leaks and head gasket failure as needed.
Refill system with the correct coolant mixture and properly bleed air from the system.
Recheck system after repair: perform a repeat pressure test and road test to verify repair and check for overheating.
Notes and cautions
Never perform this test on a hot engine. Pressurized hot coolant can cause severe burns.
Always use the correct adapter and genuine or equivalent replacement caps; an incorrect cap can give false results.
A small slow pressure loss can be due to temperature changes or minor seepage; verify with re-inspection and repeated tests.
If the water pump weep hole leaks under pressure, replacement is required.
A failed radiator cap (pressure relief valve) can cause loss of system pressure; test with known-good cap as part of diagnosis.
Typical test pressures
Most passenger cars: 15–18 psi
Some late-model/European/high-performance systems: 18–24 psi
Light trucks/heavy-duty: consult service specifications
Reporting (recommended for service shops)
Record test pressure, hold time, observed pressure loss (psi/min), and location of any visible leaks.
Note repairs performed, parts replaced, coolant type and concentration, and any follow-up recommendations.
HARRISON MVAC SERVICE AND REPAIRS LLC provides professional cooling system pressure testing and diagnostics
Cooling System Pressure Test
Purpose
Verify the integrity of the cooling system (radiator, hoses, clamps, water pump, heater core, thermostat, caps) and locate leaks or pressure loss.
Confirm system holds proper pressure for safe, reliable engine cooling and to help diagnose overheating, coolant loss, or contamination.
When to perform
Persistent or intermittent coolant loss
Engine overheating
Visible coolant residue or stains
Low coolant level with no obvious external leak
After radiator, hose, water pump, or thermostat replacement
Before vehicle submission for warranty work or safety inspection
Tools required
Cooling system pressure tester with appropriate adapter and hand pump
Pressure gauge (built into tester)
Replacement radiator cap(s) or expansion tank cap (for verification)
Clean rags and catch pan
Flashlight
Basic hand tools to access pressure port or remove cap
Preparation
Allow engine to cool completely. Never open a hot radiator or expansion tank cap.
Clean area around radiator or reservoir cap to prevent contamination.
Remove radiator cap or reservoir cap following manufacturer instructions.
Install the correct adapter from the pressure test kit to the radiator filler neck or expansion tank.
Procedure
Attach the pressure tester securely to the filler neck or reservoir adapter.
Pump the tester slowly to the vehicle manufacturer’s specified test pressure. If specification is unknown, use 15–18 psi for most passenger vehicles; heavy-duty or high-pressure systems may require higher pressure—refer to service manual.
Observe the gauge for at least 5–10 minutes:
Stable pressure: system holds pressure; likely no major external leaks.
Gradual pressure drop: indicates a leak in the system (hoses, radiator, heater core, water pump, fittings).
Rapid pressure loss: substantial external leak or catastrophic component failure.
Inspect visually while pressure is applied:
Look for coolant escaping at hose connections, clamps, radiator seams, heater core lines, water pump weep hole, freeze plugs, and around the thermostat housing.
Check under the vehicle and inside the cabin (heater core) for drips or damp spots.
Use a flashlight to inspect hard-to-see areas and the area around the engine block and head gasket line for seepage.
Perform a block/head gasket check if no external leaks are found but pressure drops:
Monitor for pressure equalization between cooling system and crankcase (may require combustion leak tester / chemical test) or follow compression/leak-down tests per repair manual.
After test
Release pressure from the tester following safe procedures.
Remove tester and reinstall a serviceable radiator or reservoir cap.
Repair identified leaks (replace hoses, clamps, radiator, water pump, seals, or gaskets) or evaluate for internal leaks and head gasket failure as needed.
Refill system with the correct coolant mixture and properly bleed air from the system.
Recheck system after repair: perform a repeat pressure test and road test to verify repair and check for overheating.
Notes and cautions
Never perform this test on a hot engine. Pressurized hot coolant can cause severe burns.
Always use the correct adapter and genuine or equivalent replacement caps; an incorrect cap can give false results.
A small slow pressure loss can be due to temperature changes or minor seepage; verify with re-inspection and repeated tests.
If the water pump weep hole leaks under pressure, replacement is required.
A failed radiator cap (pressure relief valve) can cause loss of system pressure; test with known-good cap as part of diagnosis.
Typical test pressures
Most passenger cars: 15–18 psi
Some late-model/European/high-performance systems: 18–24 psi
Light trucks/heavy-duty: consult service specifications
Reporting (recommended for service shops)
Record test pressure, hold time, observed pressure loss (psi/min), and location of any visible leaks.
Note repairs performed, parts replaced, coolant type and concentration, and any follow-up recommendations.
HARRISON MVAC SERVICE AND REPAIRS LLC provides professional cooling system pressure testing and diagnostics. If you need a certified inspection, leak location, or repair estimate, contact our service department.